Showing posts with label Makes. Show all posts

Friday, June 26, 2015

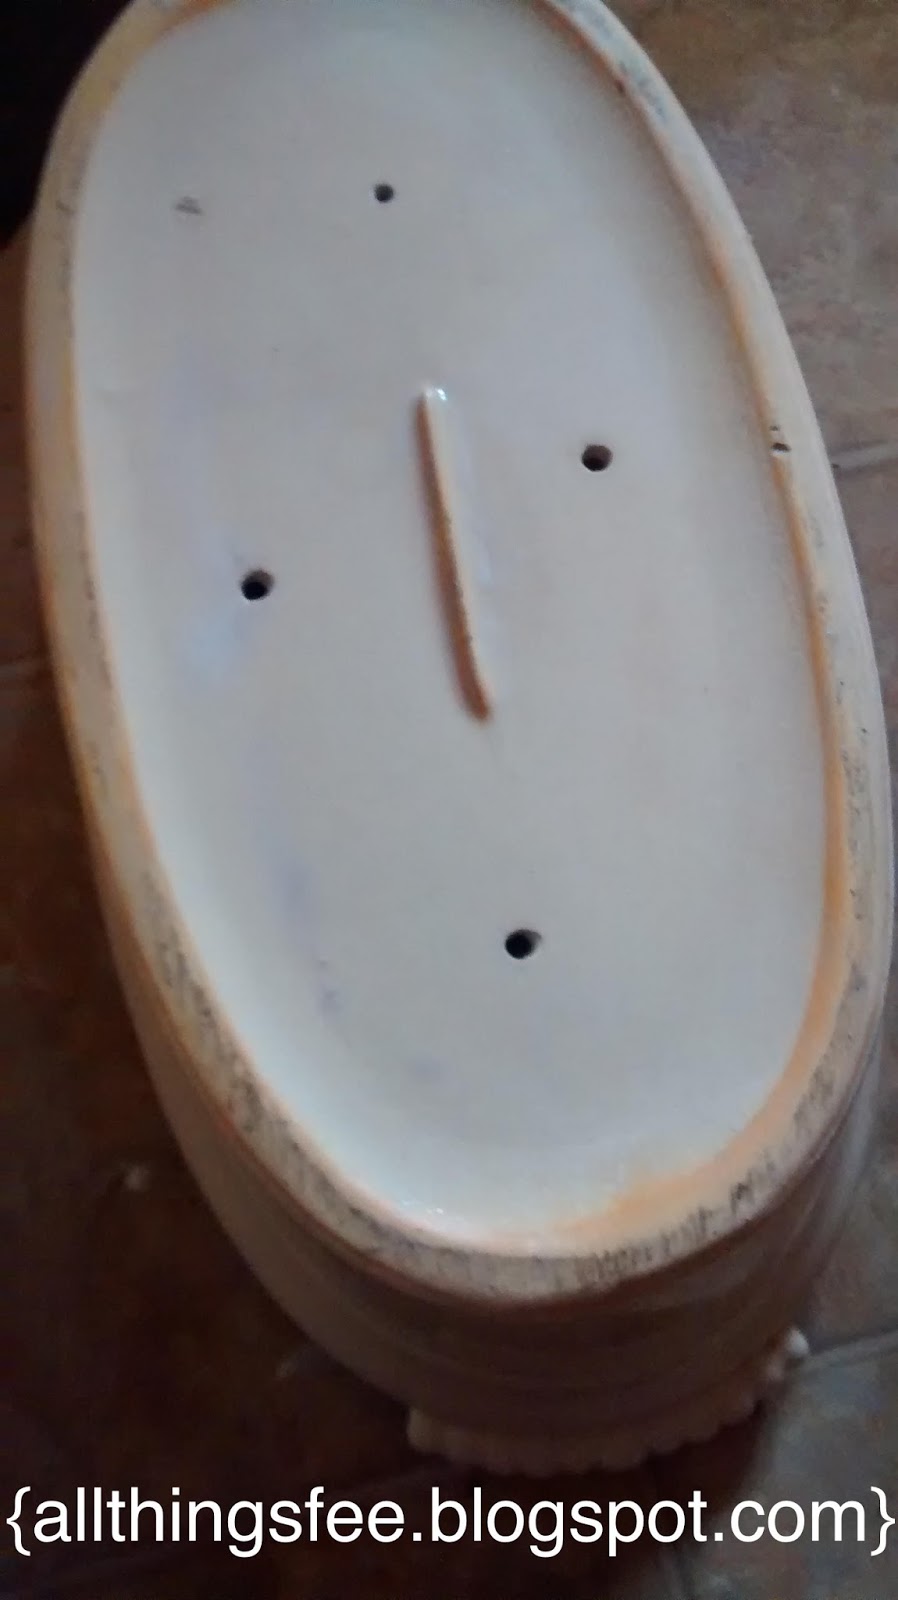
{Makes} Drilling Drainage Holes

Doesn't Drilling Drainage Holes sound SCARY?


I was so nervous when I decided to drill some holes in a giant ceramic container I was given years ago, that was living in my basement because I never knew what to do with it!
Which looking back, I shouldn't have been nervous. What was the worst thing that could happen?
The container would break, and I would throw it out. And free up space in the basement!

The other day I thought I had ran out of pots to plant in, since I am finicky when if comes to pots I grow food in, and I didn't want to use plastic. 

So I got thinking {which can lead to trouble!} what I could plant in, 
I immediately remembered this beauty! 
 
{Oops. forgot to take a picture of it empty without the drainage!}

But the downside was it had zero drainage.
And I wanted to grow herbs in it.  Which I am notorious for killing by overwatering.
Then I started thinking I could add gravel, or newspaper to the bottom.
But a quick search, led me to believe holes were the only answer.


So, I pulled out my trusty drill, painters tape and tried to drill a hole.
And. Got. Nothing.
I tried to use any drill bit, and obviously didn't have any success.
The painters tape did it's job, giving me a little grip so I didn't slide all over the pretty glaze.
But other than that, fail.


So back to the drawing board {or google}.
I looked up what the proper bit should look like thinking maybe I have something similar.
Sure enough, I did!
A whole set!
See how the end has a wider, funny tip?
That's what you need. 


So, now that I found a bit that I thought would work I tried again!
And wouldn't you know it, it worked!
So I went ahead and added four drainage holes!
It took about 20 minutes to get all four done since this is a pretty heavy piece.
Plus I didn't want to rush and crack/break it! 

My advice if you wan to try to drill  your own drainage holes is:
keep your drill at a medium speed, and don't push as hard as you can.

Slow and steady wins the race for drilling drainage holes!

And yes, I have opened up a can of worms! 
Everything I look at is not safe!

What would you drill drainage holes in first?!?!
And what should I try drilling holes in next?!?!

Wednesday, April 29, 2015

{Makes} Zoodles

Okay, now that my computer is up and running...
It's time to get back into the swing of things!


To start off easy, I wanted to share these Zoodles with you.
Ever hear of Zoodles?
Zucchini Noodles?

With garden season on its way, I foresee these being on the table a lot this summer!
They are a simple addition to any meal!

Now, you can go out and purchase a Vegetable Spiralizer, or like me use a mandolin.
I used the smaller french fry setting on my mandolin and it worked like a charm!

So, now you may be wondering how you can prepare them...
 You don't need to cook them, but I prefer to warm them up.
I just turn on a pan, get it warm, and toss them for a couple minutes.

I've had them with a tomato and meat sauce, yum!
I've had them with scrambled eggs, double yum!
Or, I had them warmed up with garlic and herb goat cheese, triple yum!

Have you ever had any kind of vegetable noodles?
I'm trying to decide what else I could use this way!


Wednesday, April 8, 2015

{Makes} Spring Egg Nests


These were so cute, I couldn't share!
But also so easy, that I felt silly to write a full pic-by-pic tutorial.

To make Spring Egg Nests:
Mini Twist Pretzels
Melting Chocolate of your Choice
Spring Colored M&M's

The biggest task for me was finding Peanut Free Melting Chocolate!
I used to love making candy, with CandyMelts but they are processed with Peanuts, so they are a no go in out house. So, I went with good old fashioned Chocolate Chips, and a small amount of shortening. 

You can use a double boiler, crockpot, etc to melt your chocolate. I went with a small pot on the stove, on low. Just keep an eye on it or it will get crunchy. Once melted I dropped a handful of pretzels in the pot and flipped them over with a fork, then pulled them out.

Here's where you will learn from my mistake! See the pic? I put the chocolate covered pretzels on my cooling rack, while it wasn't a complete disaster, it was not as easy as I thought it would be to get the pretzels back off once cooled! Next time I will do wax paper instead. 

Before your chocolate cools all the way, place an M&M in each hole of the pretzel, leaving them towards the middle make them look more like eggs, rather than standing straight up and down or laying down. 

Because your chocolate isn't boiling hot, I think kids could help with the M&M part!

That's it! A quick, easy, cute spring treat! I think these would be cute for any spring event, baby showers, birthdays, bridal showers! Or Easter (like I did!)


Friday, January 30, 2015

{Makes} Pizza Dough!

Who knew adding ONE ingredient would make such a difference in a pizza dough!
I've always made this recipe, and it was always a little dense.
Since finding the secret ingredient to restaurant quality pizza dough I have gone from an occasional pizza eater, to is it pizza night yet?!? 
And since it's Friday, it's Pizza night here! So it's the perfect time to share the perfect pizza dough recipe!

Have you figured out what the secret ingredient is?

Let's think about it...
We all know pizza dough is a yeast based dough (right?), so that isn't the secret ingredient.
Then you need water to wake up the yeast, so it's not that.
Then you need flour, so it's not that either.
Different recipes add seasonings, and they don't change anything but flavor. 

Alright, I'll finally let you in on it...
Baking Powder! 
Who knew one teaspoon could make such a difference!

To make the dough you will need:
1 1/3 cup warm water (too hot and it will kill your yeast)
2 teaspoons sugar
2 teaspoons yeast (or one packet)
2 tablespoons olive oil
3 cups sifted flour  (no sifter, no problem!)
1 teaspoon baking powder
1 1/4 teaspoon salt
1/4 teaspoon garlic powder
1/4 teaspoon onion powder

Let's get dough making!

To activate yeast, put your warm water in a bowl. Not to hot, not to cold. Add your sugar, this will act like a food to get your yeast to start metabolizing and waking up. Then stir in your yeast.  Now is when I start pulling out the rest of my ingredients, and sifting my flour.  The yeast needs about 10 minutes to be ready for dough making. I do this in my metal mixer bowl.

While I wait for my yeast, I sift my flour, baking powder, and seasonings into a separate bowl.  Sometimes you need to improvise and use a cheese grater, others a sifter works too!

Once the yeast is ready, I turn my mixer on low with the paddle on. 
First slowly add the oil, then my bowl of dry ingredients.


Once my ingredients start to get incorporated, I switch over to my hook attachment.
If you don't have a stand mixer, I imagine you could do this in a food processor, or by hand.
If by hand I would say use a spoon until now, then knead by hand.


At this time I use the medium speed on my mixer. I've seen some recipes say allow the dough to mix on medium speed for 10 minutes. I don't think you need to for that long, all it does for me is shake my mixer across the counter, so I like to mix it on medium until I get a nice ball. 


No for some hands off time. The rising. 

If your kitchen is warm, all you need is a damp kitchen towel over the top of your bowl.  

If your kitchen is cold like mine there are a couple of tricks you can do. 

I use my oven. When I start my yeast, I turn my oven on full blast. My oven is 1970's old, so it takes forever to heat up, so you may need to play with your oven temperature. when I'm just about ready to turn my mixer to medium with the dough hook I turn it off.  You don't want to bake your dough in the bowl, just keep it warm. Then I place my dough, with the wet kitchen towel in my oven to rise.

If you have a microwave (we don't), you can put a bowl of water in the microwave for 5 minutes, then take it out and put your dough bowl in (don't turn back on). You just want the moist warm environment.


After an hour or so, you have beautiful fluffy dough!
I like to scrape the sides of my bowl with a spatula, and dump it on the pan I am going to bake it on.


Once on the pan, I roll it out with a  rolling pin. 
I find the less pressure you roll with the better. 
You don't want to ruin all the air bubbles, it will make it dense.


See the corners? I use my fingers to spread the dough to them. Or you could leave it short too.


Now for some toppings! 
If I'm doing a red pizza I start with my canned garden tomato pizza sauce. 
If I'm leaving white, I will add a little more garlic.


For the kids, just cheese! My husband pepperoni! 
My personal favorite? White pizza with Garlic and Broccoli.

Yum! 

Happy Friday!
And Happy Pizza Night!

I'm off to make my dough for later!


Friday, January 23, 2015

{Makes} Yogurt

Makes? Cooks? I'm not really even sure if this qualifies as making or cooking. 
But I'm not sure what else to label it!


Yogurt, it's a funny thing in the All Things Fee household. We either love it or hate it. We are kind of picky about it. I've always been a fruit at the bottom fan (but rarely bought it), I think because its not as thin as the mixed stuff. Then I made the mistake of getting my husband hooked on greek fruit at the bottom. Boy can it be pricey! He would take one a day to work, and then the kids would want some, and I'd be guarding the ones for him each week! We even tried buying regular yogurt for the kids (they weren't finishing a cup, and refused to share) and greek for my husband and they would still take his!

I had mentioned a couple times that I wanted to try to make my own, but never got around to trying it out. But then Santa Nana {my mom} gave me a yogurt maker for Christmas! While it isn't necessary to have a yogurt maker, it made it easier (no checking on it, until 8 hrs later) especially for the first try. It took a lot of second guessing away.

Now, that I've made it quite a few times I am finding what flavors we like, and how many batches to make (my maker only makes 2 qts at a time), and how easy it really is.

If your thinking about making yogurt, it really is simple.
Plus, if you think you don't have time to make yogurt, think again!
Your busy for the first 15minutes or so, then you wait 8 hours, move it to the fridge, wait 8 more hours, then wait a couple more hours (if you strain it) then divide into containers. 
So it's maybe 30 minutes of "work" the rest is wait time.


To make your own you will need:
Milk (My yogurt maker only holds 2 qts, so that's how much milk I start with.)
Yogurt "starter" (Just live culture yogurt from the store, or from a previous batch (thats what I used)
A pot (big enough to warm your milk in)
Thermometer (Key temps 115' and 185')
Yogurt maker (other options later in post)
Cheesecloth, Strainer (if you like your yogurt thick)
Containers to store in


Let's get yogurt making!
Heat milk to 180' your not looking to boil it, just warm it up. 
Also I stir it a lot, I don't want any burning to the bottom of the pan.
 Cool to 115', I fill my sink with cold water, and put the pan in the sink full of water.
Add a bit of live culture yogurt. I like to scoop a couple ladle-fulls of warm milk into the yogurt to incorporate. Then I mix it into the rest.
(I've seen the amount of yogurt vary greatly, a couple tbspns to a cup, 
so I am still working on what works best for me, so far I think 1/2 to 3/4 cup may be the winner.)
   Then keep warm for 8 hours.
This is where I used the yogurt maker, But I've seen recipes/tutorials use a crock pot, your oven (off with light on) or cooler full of warm water. This is the "trickiest" part from what I've read. 

After 8 hours, put in the fridge ( I do overnight), and decide if it is thick enough to your liking.
Like I said, we like it thick like greek yogurt, so I strain some of the whey off.


Now, the straining process is simple, the timing of it depends on how thick you want your yogurt. 
My yogurt machine came with a straining bag. It looks and feels like a light canvas material, or even a muslin material. It has to pull strings to close if you want. Personally, I put the bag inside out,so the seams and strings are on the outside and not inside with the yogurt. Then I just set it in my strainer, and the strainer in a my giant pot (so that strainer handles balance on the rim, and the whey falls away from the bag). You want the whey to fall away from the yogurt, not sitting in it.

I haven't timed my yogurt straining. I just put the pot in the fridge, and check on it with a spoon. Once it is thick enough I lift the bag and squeeze it once or twice.


This is the whey. It's a thick liquid that I've read is wonderful for you. I haven't tried to do anything with it (some drink it straight, some bake with it), except give to our Golden Retriever. He LOVES it. I just pour it over his dry food and he goes to town.  He had some "doggy dandruff" going on, and I've noticed a big difference in his coat and he is less "flaky"!


Once your done straining your yogurt, divide into individual containers if you plan on packing in lunches, or put in a large container, add toppings of your choice! Also, save some plain if you plan on making again! You can use a bit from this batch to start your next! But I have noticed after 2-3 batches I need a new starter. I found it didn't seem to smell as fresh once we were a couple batches away from the original. 


So far, my husband likes cherry pie filling and blueberry as a topping.
Hopefully this summer our *new* cherry trees produce, so I can stop buying store bought. 
I bought the cherry pie filling, but for the blueberry I cooked down blueberries in simple syrup.
Personally, I am a peach fan, so I am anxiously awaiting my peach trees this summer!

Other perks of making your own yogurt?
 You can strain it until it's a solid and use like a cream cheese!
Use as sour cream! I can't tell you how many times I've bought the smallest container of sour cream and had it go bad because we don't use much! I've used it to make french onion dip, and no one was the wiser!
Whey! Cooper (our golden) loves it, but I am tempted to substitute it for water in baking recipes.

The first time I made yogurt, I felt I was crazy.
 But seeing the difference in price, and quality made it worth it!

What have you made that you swear you'll never buy in store again?
Me? Pickles and now yogurt!