Showing posts with label Joanns. Show all posts

Thursday, December 19, 2013

Sews: Advent Calendar

Every year, an Advent Calendar is on my list of "to makes".
Every year I put it off. This year I finally did it!
I may be late but I did it! And next year I won't have to put it on my "to make" list!

The hardest part was starting! So, I decided to start with the top half of my felt that is more decorative.
I have seen this advent calendar floating around blogland, and I loved the tree. 
A little bit realistic, a little whimsy. It was perfect.


So much so I sat staring at my computer screen with paper and slowly sketched it out.
Once sketched out, I used the papers as my pattern, alternating light green and dark green.

As for the countdown part, I just could not make up my mind.
My mother has a countdown that you move the stuffed mouse everyday,and thought I would make that.
Then I loved all the calendars with the pockets for treats, or notes.
But I also loved the ones with ornaments to hang too.


In the end I just went with it, making mine so that it can grow with us and be used in different ways each year if we want to. I started by looking at my moms, and hers had 4 rows with 6 pockets per row.
So, thats what I did! Using strips of white felt (3"tall x 18"wide) I sewed them down creating pockets.

Then I needed to decide what to use as ornaments, or countdown markers. 
Joann's sent me a lovely box of goodies to Celebrate the season with them, and they lovingly sent the perfect amount of buttons! 18 red, and green traditional buttons and 6 gingerbread men buttons. It couldn't have been more perfect!


To make my advent ornaments, I pulled out my jewelry making supplies!
This couldn't have been any easier! 
Using earring hooks, and eye pins.


And in no time I had 24 perfect sized ornaments! 


Look how cute they look in their pockets!

Now to all together! 


Even though I didn't get to use it this year, I will have it for years to come!
Plus if I don't want to hang the ornaments everyday, I can put them all on and either use a clothespin to countdown the days ( decorated in some way of course) or put notes/activities/candy in each day for the kids!


Again I can't thank Joann's Fabric and Craft Stores enough, for challenging me to Celebrate the Season! It has kept me on my toes, and added some wonderful holiday treasures that I plan to use for years to come!



Thursday, December 12, 2013

#Fabulouslyfestive Ornaments

I am so pleased to be working with Joann Fabric and Craft Stores to Celebrate the Season!

This month I was asked to create something #Fabulouslyfestive for the December holidays!
In an effort to use some of my glass ornaments, that are no longer safe on my tree, I came up with an out of reach for little hands solution!

What do you think?


So far I love it, and everyone that have come into my kitchen has loved it! 

Want to create you own?

You'll need:

A curtain rod
Ribbon
Scissors
Hot glue gun, Hot glue sticks
Ornaments
Don't forget your Joann's Coupon! 
 (at the end of this post!)

Ready to get started?


To start, I hung up my curtain rod. I measured down a foot from my ceiling and made a mark.
Then, I started my screw on the mark. Then added the hardware.


Next start adding ribbons!
I would put the ribbon over the rod, and then glue where the clip is in the picture.


Continue to add ribbons until your rod is almost full. For the length I just eyeballed different lengths, some short some long. Remember you can always cut shorter, so I went with longer and then adjusted after the next step!


Continue to add ribbons until your rod is almost full.


Lastly, add your ornaments! I just threaded the ribbon through, pulled the ribbon up the back and glued.
Just like I did for the tops.


At this time you can adjust the spacing, by sliding the ribbon along the rod,  and adjust the length of some of you ribbons.  Overall this is the hardest step! 

What do you think? 
I'm loving it! It's the perfect amount of color, and decorations for my kitchen! 
I also can't wait to add some non holiday decorations to the curtain rod!

Running out to make your own?
Don't forget your coupon!


Disclosure: This post is sponsored by Joann's Fabric and Craft Store. I was given a gift card to Joann Fabric and Craft Stores to create a #fabulouslyfestive for the Celebrate the Season Campaign. 

I can't thank Joann's Fabric and Craft Stores enough, for challenging me to Celebrate the Season! It has kept me on my toes, and added some wonderful holiday treasures that I plan to use for years to come!

Wednesday, November 20, 2013

My #Turkeytablescapes!

I am so pleased to be working with Joann Fabric and Craft Stores to Celebrate the Season!
This month we are celebrating Thanksgiving, and when challenged to create a #turkeytablescapes, 
I was brought back to my childhood when my Nana used to host Thanksgiving.

Let me tell you, my Nana knew how to set a table.
Linens, cloth napkins, place cards, and a centerpiece. 
To me, it always felt like we were celebrating Thanksgiving in a fancy restaurant. 

So when Joann's asked for me to create my #turkeytablescapes, I knew what elements I wanted!

Starting from the bottom up, I knew I needed a tablecloth. Since I couldn't find a plain one, I went ahead and purchased 90" bleached muslin, cut a circle and hemmed it. Worked like a charm!


Next, the cloth napkins. 
I found this cute Pumpkin Scribbles fabric, that was perfect for Thanksgiving!
If I ever gift you handmade cloth napkins, I must really like you, or got really good at mitered corners using this video.


Then the table cards. 
Just some craft paper cut into cut leaf shapes (by hand) and tied with embroidery floss to a stick. 


And lastly the centerpiece.
Because our table is pretty small I couldn't waste too must "real estate" on a centerpiece. My plan was for a small pumpkin hallowed out, and fresh flowers. But instead, when I was shopping I picked up some artificial flowers from Joann's. Then using a screwdriver, I poked holes into the pumpkin, and pushed the flower stems in it. Now, I am regretting not picking up a faux pumpkin! I guess there is always next year! The glass underneath always lives on my table, its an old cake plate and it's perfect for using as a hot plate!


I love how the individual elements came out, but I love how they look together even more!

Working on your own tablescape?
Make sure to shop at Joann's for all your tablescape needs!
And don't forget your coupon!


Disclosure: This post is sponsored by Joann's Fabric and Craft Store. I was given a gift card to Joann Fabric and Craft Stores to create a #turkeytablescapes for the Celebrate the Season Campaign. 

Wednesday, October 23, 2013

#Spookyspaces Trick or Treat Station

Over the last couple weeks, I have teamed up with Joann Fabric and Craft Stores to create a #spookyspace for Halloween! And what do we all need for Halloween? 
A Spooky Trick or Treat Station!

It all started with my Spooky Skeleton Portraits...


Then our Spooky Skeleton Candy...


And what's Halloween without some quick masks to answer the door with!


Want to create your own Trick or Treat Station?
Stop by Joann's!
And don't forget your coupon!


Disclosure: This post is sponsored by Joann's Fabric and Craft Store. I was given a gift card to Joann Fabric and Craft Stores to create a #spookyspace for the Celebrate the Season Campaign. 


Friday, October 18, 2013

Bakes & Sweets: Spooky Skelton Candy

Ever make candy? It's super easy with Candy Melts!
Pick out your mold, melt, fill, chill, done!
So when I was working on my #spookyspaces for Halloween and Joann Fabric and Craft Store, I knew candy would be included!


When I went shopping at Joann's I made sure to check out their molds.
Seriously, there are so many awesome molds for candy, you can make it for any theme!
But sticking with spooky and Halloween, I picked up some skulls and skeleton fingers.


When I was making the skulls, I thought how could I make more without using more chocolate?
Fill them? And what better to fill skulls with... but brains?
So I started plopping cherries into the skulls, and the effect is perfect!

Look at those eyes! Love. 
The perfect amount of spooky for my little ones!

And how about the fingers? Looking good in that jar!
Now, I wont give these to any trick or treater, because they are not wrapped. 
But friends, family that I know... Absolutely!

Headed to Joann's? Thinking about trying your hand at candy making?
Don't forget to use the coupon!


Disclosure: This post is sponsored by Joann's Fabric and Craft Store. I was given a gift card to Joann Fabric and Craft Stores to create a #spookyspace for the Celebrate the Season Campaign. 

Wednesday, October 16, 2013

Eek! Skeleton Portraits

I will be the first to confess, with three littles four and under.
Decorating this year was going to be put on the back burner.
Until I teamed up with Joann Fabric and Craft Stores
to create a #spookyspace!


 What do you think?
Now, thanks to Joann Fabric and Craft Stores I am ready to answer the door for our trick or treaters!

To create my #spookyspace, I started with the wall. All year round it's bare! 
So I thought I better start there!
What better than to put on the wall than portraits? Even better, spooky portraits!

To make my Spooky, Skeleton Portraits of the kids, I started out by going to my local Joann store.


I picked up:
3 - Wood Plaques
Black & White Paint
Paint brushes
Ribbon

First things first, I needed a skeleton to work from. 
After a quick search I found this one


Instead of printing and messing with the size, I just traced it off my screen.
Using a piece of paper I decided that if I folded it in half the head would fit on my plaque.
Then I pulled up the image, and traced. Super simple!

Next, I traced my skeleton with a ball point pen and a little pressure on my plaque.
This gave an embossed effect, even after I painted my background the skeleton would be on there.


Next, Paint!
Starting with the background, then using a small brush to fill in my skeleton.


Personalize!
To make my portraits match my kids, I did two bow ties (boys) and one hair bow.
Glue them in place.


Hang!
To not have to put three holes in the wall, I decided to hang them together using a D ring.
I put the ribbon through the ring, then glued and sewed in place to ensure it didn't come crashing down!


To hand my portraits from the ribbon, I first put some glue on the ribbon, then because of the weight I screwed them to the ribbon too!


Want to make your own? 
Make sure to shop at Joann's! 
I've got a coupon for you!


Disclosure: This post is sponsored by Joann's Fabric and Craft Store. I was given a gift card to Joann Fabric and Craft Stores to create a #spookyspace for the Celebrate the Season Campaign. 


Friday, October 11, 2013

Kid Craft: Making Spooky Masks!

Have you ever picked up any of the masks in Joanns?
You know, the bare wood ones in the dollar bins?

I've picked up a few for the boys and I to color, and we are hooked!

Here are some of out latest!


My favorite part? 
We've painted them, colored them with crayons and colored pencils. 
And all look great!


Disclosure: This post is sponsored by Joann's Fabric and Craft Store. I was given a gift card to Joann Fabric and Craft Stores to create a #spookyspace for the Celebrate the Season Campaign. 

Monday, September 2, 2013

#Waverize It! Challenge!

Happy September! 
How about Waverly Fabrics 90th Anniversary?

To Celebrate Joann's Fabric and Craft Stores are hosting a contest, the Waverize It! Challenge!
Fun? Right!


I was sent this fabric, and man is it gorgeous! The weight of the fabric, the colors, everything about this fabric is great! When I opened the fabric I could not believe the colors, they are so my style! For a couple days, I walked around going room to room to decide where I should use it. Living room? Dining room? Bathroom? Kitchen? Oh the possibilities were endless! 

After really thinking about it, I decided why not jazz up my dining room. 


I kid you not, these are our everyday dishes! I love my mismatched Fiesta ware!
And I love that the fabric matched it!
But I didn't want to do something traditional, not a table cloth,  not window treatments. 
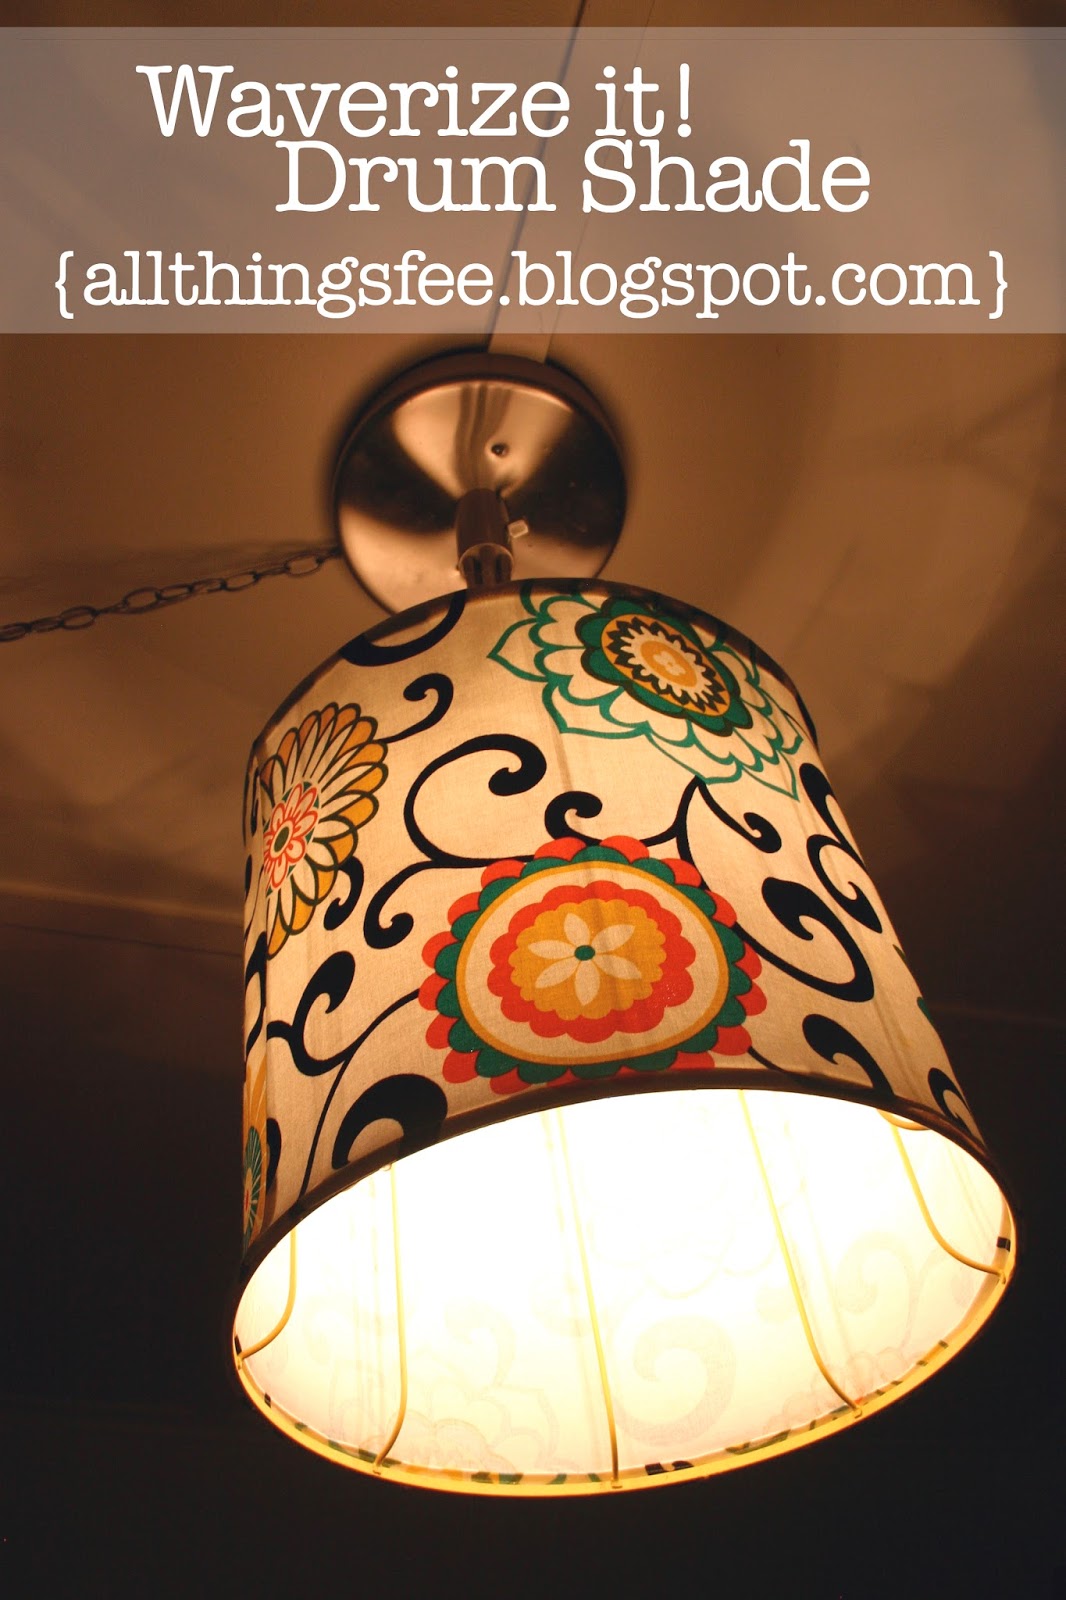
I wanted something unique.... how about a drum shade to update our light fixture?


What do you think?
Amazing right?
I think I hit unique and wow right on the head.

Everyone who has seen it has loved it! It's the first thing when you walk into the dining room that you see, heck, its the first thing you see when you walk into my house now!

To make the drum shade was pretty easy, so if you have never sewn. 
You could sew this.
It's all straight lines!
And only 3 seams!


To make your own drum shade you will need:
A drum shade/frame
Fabric
Sewing Notions ( Sewing Machine, Thread, Scissors, Etc)
Hot Glue Gun & Glue


First thing first, prepare your shade/frame. I mentioned to my mother I wanted to update my light and she said she had a frame! Perfect! So she brought it over and I began to remove the fabric since I didn't think adding the fabric to the existing frame would allow much light through.


Once the frame was bare, I took some measurements. Actually, to be honest, I just took the fabric and wrapped it around the shade! The fabric is 54" wide so I was able to use that to go around my shade and then measured the height and cut my fabric into a rectangle.

Here is where the sewing comes in! Super simple. 
You could probably do this with a hot glue gun if you don't know how to sew. 
But I sewed mine, so here's how:

Taking my rectangle to my sewing machine, I hemmed the top and bottom edges. 
This will be the top and bottom that you see all around my shade.

Once I got the edges finished I wrapped the fabric around the shade to double check where I needed to sew again to create my tube. The sewing gods were on my side for this project! I didn't have to cut any fabric, the 54" worked like a charm!

So back to the sewing machine! With right sides together, and my raw edges lined up, I sewed a straight line and created my tube! 

At this point I was getting so excited! I couldn't wait to finish!


But as I looked at my frame, I decided that the tan color was too boring, and I was going for wow.
Yellow spray paint? Yes please!

Once my frame was dry, I brought it inside, plugged my glue gun in and starting lining the edge of my fabric up to the frame. I used some clothes pins here and there to help hold things in place.
As I was gluing I made sure it was tight.


What do you think? Love it? 
I know I do!

Now, it's your turn to create something and enter the Waverize It! Challenge
All you need to do is create a project using Waverize Fabric, 
go to the Waverize It! Challenge and upload a picture! 

The Challenge runs through September 22nd, so get going and enter! 
Did I mention prizes? Fabric and a Joanns gift card? Every crafter's dream!

Thank you Joann Fabric and Craft Stores, and Waverly Fabric for this amazing opportunity!
 I love my new lamp, and it has definitely inspired more of my own projects!


Disclosure: This post is sponsored by Joann's Fabric Store. I was given the fabric to create something that would be used as inspiration for their Waverize It! Challenge