Showing posts with label Crafts. Show all posts

Friday, July 8, 2016

{Recap} February 2016

February is here!
That means Carter's Birthday and Baby Boy's Birth...and you'll never believe it! 
Read to the end to see what else happened!


My sister did it again! Blew me away with another amazing cake. We've been telling her for years to go into business! But she won't! And you know what...  I'm okay with that! More time for my kids' awesome cakes!!  This is 144 mini cupcakes! Talk about a labor of love for a nephew!


Whipped up these shirts the day before my pre op appointment.
When we had Ellie both boys wore Big Brother shirts, but I thought this lineup fit us perfect!
Baby Brother, Big Sister, Bigger Brother and Biggest Brother!

When I went to my pre op appoint I found out the kids could not come to the hospital to meet baby!
I was devastated! Anyone else ever have this happen?
NYS put an age limit on visitors because the flu was high in the region.
With all my babies that has never happened!


Here he is! Practically perfect in every way! 
Baby boy was nameless until after he was born!
Mommy and Daddy could not agree! 
Mommy and some of the kids wanted Nolan. While Daddy didn't
Once baby was born Daddy came out with Everett. 
I had mentioned once after we found out he was a boy, and Daddy wasn't in love with it.
But clearly he let it sink in, and that was that. Once he saw him, he said He looks like an Everett.
So Everett it is!


Now onto the "fun" of the month.
This is my kitchen. This is my kitchen just days after having baby Everett.
That hole in my cabinets? Used to hold an ancient oven. It finally died.
We guessed it was from 70's but upon taking it out there was a date of 1954 behind the cabinet.
So your guess is as good as mine.  

Either way, because of the age of the oven. New wall ovens are not the same size. 
Our opening for the oven was 28" wide. We were able to find one oven that size, on clearance because it was discontinued. I knew it wasn't going to work. But was hopeful since the price was right, so I came home. Picked out my largest pans (turkey roasting pan and biggest cookie sheet) and went back and sure enough neither fit.  

Back to the drawing board.


With that said, we had to take out the cabinet the oven was in, plus the cabinet under the stove because we now had to look for a one unit stove/oven.  

A little irony for you.When we bout the house in 2007 I though "oh no! This setup is so dated." 
And over time fell in love with it. No bending over to pull turkeys, cookies and casseroles out of the oven. So when we had to get a one unit, my husband and I were a little bummed!  


Now, about that one unit...
Ah. A five burner gas unit.
I am in cooking heaven. 
My husband knows I love to cook, and can.
We went back and forth over electric vs gas quite a bit. But in the end gas won.  
A huge factor was my All American Canner. It is very heavy and it is recommended to not use on an electric glass top stove. Most electric stoves are glass topped now. And if they aren' they are super cheap in price and look/feel.

Now that I have been coking on gas for a couple months, I can say I'm not sure I would go back to electric.  If we bought a house with electric, fine. But eventually I would switch it over to gas. It definitely has its perks!  

So there it is... what a month! 
Don't worry, my kitchen does not look like that anymore! 
Even with a newborn we made progress!  


Wednesday, June 8, 2016

{Recap} June 2015

Ah, June 2015 the month we found out we would be having another baby! 
The month where blogging slowed down...  But there were definitely things to blog about! 
So here I am trying to recap what happened June 2015...

As usual the garden was booming....


and most important my "baby", my oldest son graduated from Kindergarten! 
And yes, I did cry!


To celebrate, and thank his teachers I had this grand idea to make them cute tote bags. 
In my head, I wanted to use my sister's silhouette to use Heat Transfer Vinyl. And well, that was an epic fail. We could not for the life of us get it to cut, we followed several tutorials online and in the end wasted an entire roll of vinyl. I was convinced we got a defective roll, since she has cut vinyl before so I contacted Silhouette.  I was just as disappointed with their customer service as their product, so my dreaming to own a Silhouette days are over.  

Anyways, end of negativity.

So I went the old tried and true route, paint! 

Yes, All I did was pencil out my design and free hand painted with puffy paint.
Now before you go thinking puffy paint? 
Doesn't that scream 80's sweatshirts?  
Hear me out.


If you go super slow with puffy paint and squeeze hard you get that 80's look.
If you get your "squeeze" or tension right white bottle it does not come out like that. 
Yes, it's three dimensional but if you paint thick with a thin tip paint brush you would get similar results too.

So I found cute quotes for my son's Kindergarten Teacher and her Aide. 
I think they came out cute! I then rolled them up and tied them like a diploma so carter could hand the tote diploma to them!


There you have it, a couple things I did for June! 


Friday, October 11, 2013

Kid Craft: Making Spooky Masks!

Have you ever picked up any of the masks in Joanns?
You know, the bare wood ones in the dollar bins?

I've picked up a few for the boys and I to color, and we are hooked!

Here are some of out latest!


My favorite part? 
We've painted them, colored them with crayons and colored pencils. 
And all look great!


Disclosure: This post is sponsored by Joann's Fabric and Craft Store. I was given a gift card to Joann Fabric and Craft Stores to create a #spookyspace for the Celebrate the Season Campaign. 

Monday, September 2, 2013

#Waverize It! Challenge!

Happy September! 
How about Waverly Fabrics 90th Anniversary?

To Celebrate Joann's Fabric and Craft Stores are hosting a contest, the Waverize It! Challenge!
Fun? Right!


I was sent this fabric, and man is it gorgeous! The weight of the fabric, the colors, everything about this fabric is great! When I opened the fabric I could not believe the colors, they are so my style! For a couple days, I walked around going room to room to decide where I should use it. Living room? Dining room? Bathroom? Kitchen? Oh the possibilities were endless! 

After really thinking about it, I decided why not jazz up my dining room. 


I kid you not, these are our everyday dishes! I love my mismatched Fiesta ware!
And I love that the fabric matched it!
But I didn't want to do something traditional, not a table cloth,  not window treatments. 
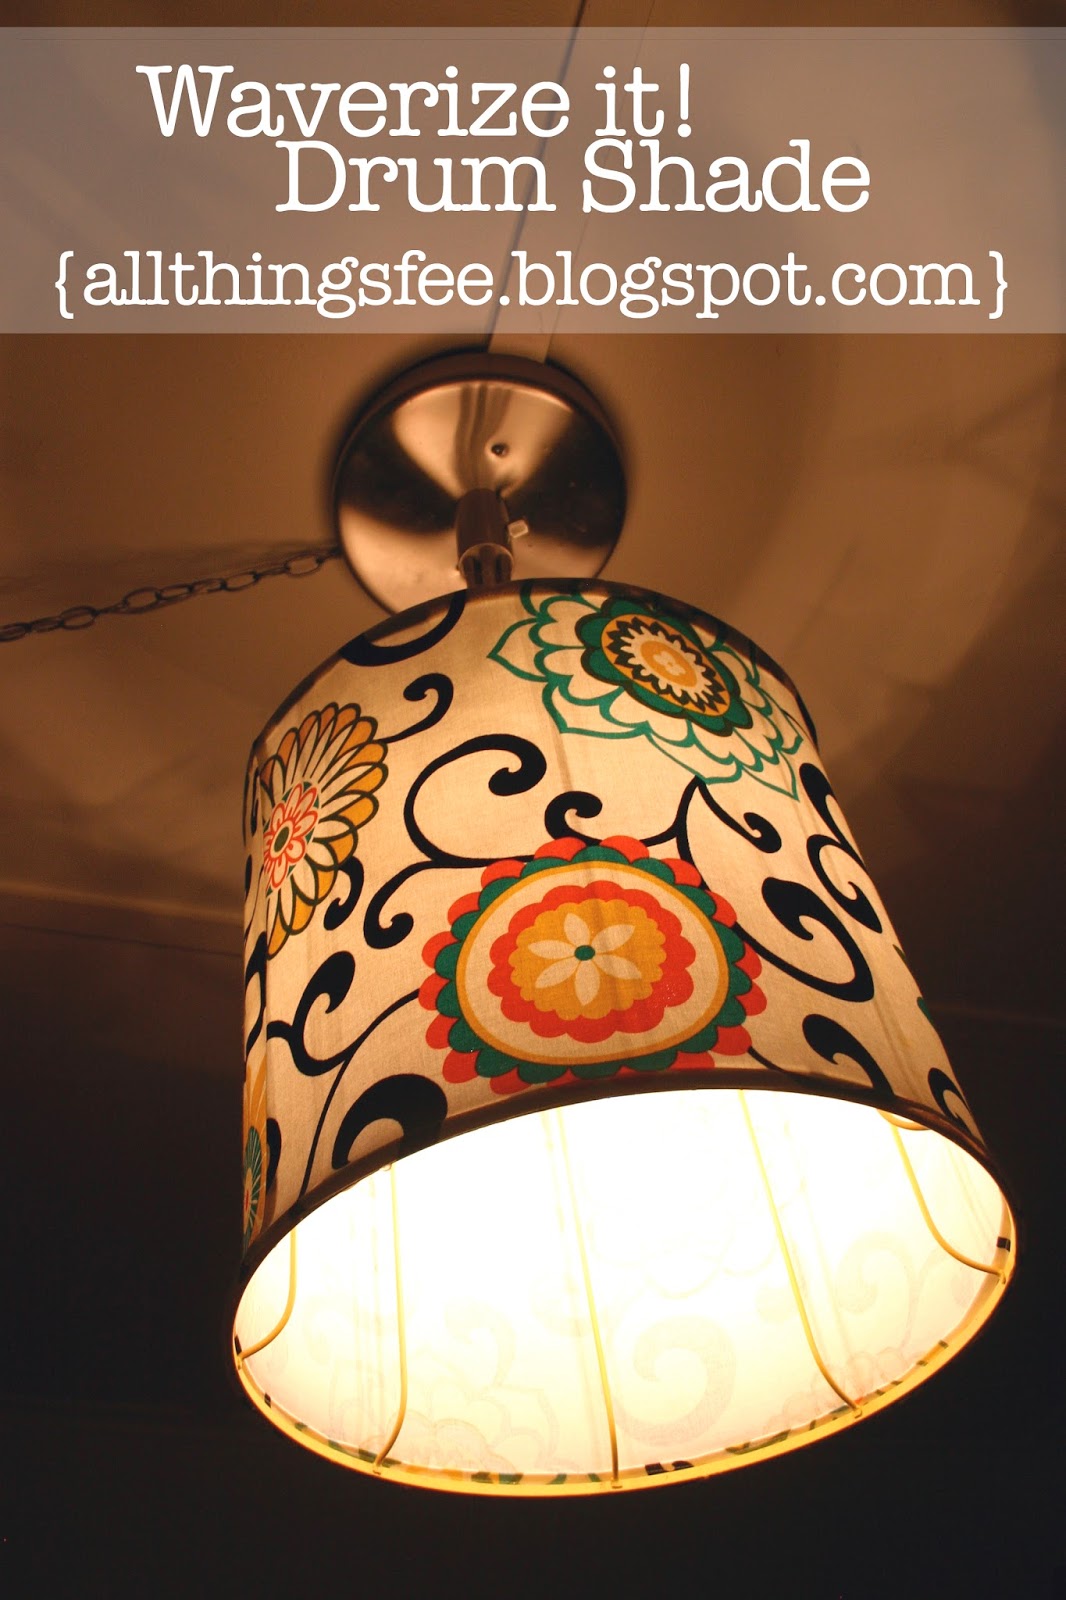
I wanted something unique.... how about a drum shade to update our light fixture?


What do you think?
Amazing right?
I think I hit unique and wow right on the head.

Everyone who has seen it has loved it! It's the first thing when you walk into the dining room that you see, heck, its the first thing you see when you walk into my house now!

To make the drum shade was pretty easy, so if you have never sewn. 
You could sew this.
It's all straight lines!
And only 3 seams!


To make your own drum shade you will need:
A drum shade/frame
Fabric
Sewing Notions ( Sewing Machine, Thread, Scissors, Etc)
Hot Glue Gun & Glue


First thing first, prepare your shade/frame. I mentioned to my mother I wanted to update my light and she said she had a frame! Perfect! So she brought it over and I began to remove the fabric since I didn't think adding the fabric to the existing frame would allow much light through.


Once the frame was bare, I took some measurements. Actually, to be honest, I just took the fabric and wrapped it around the shade! The fabric is 54" wide so I was able to use that to go around my shade and then measured the height and cut my fabric into a rectangle.

Here is where the sewing comes in! Super simple. 
You could probably do this with a hot glue gun if you don't know how to sew. 
But I sewed mine, so here's how:

Taking my rectangle to my sewing machine, I hemmed the top and bottom edges. 
This will be the top and bottom that you see all around my shade.

Once I got the edges finished I wrapped the fabric around the shade to double check where I needed to sew again to create my tube. The sewing gods were on my side for this project! I didn't have to cut any fabric, the 54" worked like a charm!

So back to the sewing machine! With right sides together, and my raw edges lined up, I sewed a straight line and created my tube! 

At this point I was getting so excited! I couldn't wait to finish!


But as I looked at my frame, I decided that the tan color was too boring, and I was going for wow.
Yellow spray paint? Yes please!

Once my frame was dry, I brought it inside, plugged my glue gun in and starting lining the edge of my fabric up to the frame. I used some clothes pins here and there to help hold things in place.
As I was gluing I made sure it was tight.


What do you think? Love it? 
I know I do!

Now, it's your turn to create something and enter the Waverize It! Challenge! 
All you need to do is create a project using Waverize Fabric, 
go to the Waverize It! Challenge and upload a picture! 

The Challenge runs through September 22nd, so get going and enter! 
Did I mention prizes? Fabric and a Joanns gift card? Every crafter's dream!

Thank you Joann Fabric and Craft Stores, and Waverly Fabric for this amazing opportunity!
 I love my new lamp, and it has definitely inspired more of my own projects!


Disclosure: This post is sponsored by Joann's Fabric Store. I was given the fabric to create something that would be used as inspiration for their Waverize It! Challenge. 

Wednesday, July 24, 2013

Art Canvas to Canvas Chalkboard

As some of you may know, I went to college for art and photography.
With three degrees under my belt, I have my share of prints and projects that are just stored away.

One assignment was to create a stage prop for a play the college was doing.
The storyline is of an artist who is in love with two women, and when he is painting them seperately, the paintings are a blend of the two women. My photography class photographed the women, and in Photoshop blended their two photographs together. Mine was chosen to be used in the play!
So it was printed onto a canvas and attached to canvas stretchers.
And now I had this: A 2 ft x 3 ft, half nude woman made up of two women.


Well after years of her in storage, and facing the wall because I thought it was creepy.  I decided it was time to do something and to change it up. My choice was simple. Paint over her.

Clearly "she" didn't like that. After one coat of paint, the printed image started to peel off. 
But that's okay, it peeled pretty easyily. See?


Then, using chalkboard paint I covered the canvas with two coats and was done!


Isn't it great? A nice lightweight chalkboard! 
And I had everything on hand!


Friday, February 22, 2013

DIY Mail Station

While, I loved my command center it lacked in mail/paper storage.

It had one pocket, and clearly that wasn't enough. 
There were times it would burst open and everything would fall to the floor. Boo.

After looking around for options, I always came back to the stacked multiple file sorters.
And after looking for options, I looked at this box and thought. Huh. Would it work?


First, I took the top off the box ( It was a gift box) and cut the top and bottom in half the long ways.


Then I took the four pieces and measured the corners to create "angled" sides.
Which really all you have to do it go from top back corner to the bottom front. 


Cut on the line, but do not cut the bottom out of the box.
I folded the bottom up the back so papers won't slide down.
Repeat for all four.


If you flatten your piece this is what it should look like.
My measurements are:
Top Side triangles: 3 1/2" Wide, 4 1/2" Tall
Main Rectangle: 15" Wide, 4 1/2" Tall
Bottom Rectangle: 15" Wide, 3 1/2" Tall
Bottom Triangles: 2" Wide, 3 1/2"Tall 

Mine is all one piece, 
but if you had to use all those measurements as individual pieces and build it should work too!


Time to Assemble!
I used a hot glue gun, and tape. 
Thinking A.) this isn't going to work B.) This is my prototype.
(Which ironically has been up for almost a month with no issues!)

To assemble, I folded the bottom rectangle up the back and small triangles inside the angled sides. 
I had to trim them a little to fit, but then just glued and taped. 
Then, I stacked them, and lined up the backs.


Here is a better look at the backs, and how I hung it. 
Since it's so light I just put two push pins in each level!


Add a large calendar, and I've got a new Kitchen Command Center!
Yea!


Wednesday, February 13, 2013

Watching our love grow...

I'm going to apologize first for the photos! 
This is my husband's Valentines day gift, so I will take better ones this weekend and update! 

I've always loved the idea of marking your children's ages on the wall. Except the fact that it was on the wall. You can't paint the wall down the road, or worse, not being able to take it with you.

 After seeing some amazing rulers in blogland, I got to work.


I didn't follow any tutorial because it was pretty simple. Turn a piece of 1"x6"x6' into a ruler.
Simple enough.

Here's some things I thought about and did:

- I wanted to include birth heights, so my shortest was 18 1/2". I ended up started it at 6 " to give us some room on the bottom.

-I used my clear acrylic ruler and a pencil to measure all my inches first.
 Then went back and lengthened my 3", 6", 9" and foot marks.

-Then I went back with a permanent marker ( I checked to make sure it didn't bleed on back first!)

-For my numbers and Palmer Company, I printed out a font (American Typewriter) then scribbled on the back of the paper, traced over the front so it transferred the pencil to the wood. 

-Then I s l o w l y, used the marker to trace over the pencil and fill in.

- For "watching our love grow since 2008" I just free handed it.


-And now my favorite part! Instead of just added my children's current heights, I asked my pediatrician for all of their heights since birth! So I went back in with just pencil so it looks like we lined them up all along!

Do you measure your kids? Will you be making your own ruler?
It took me longer to plan it out in my head than to make it, I swear!


Tuesday, October 30, 2012

Not ONE, Not TWO...But THREE

This year we left it up to Carter what he wanted to be. 
And me being that crazy mommy wanted Wyatt to match in some way.
Well, when Carter narrowed it down to "Teleskins", I mean Skeleton. 
I decided that both boys could be Skeletons, 
and maybe if Mommy had the energy she would be one too (I'll let you know if that happens!)

100_1482

Using this awesome, free template I made freezer paper stencils and went to work!
Instead of printing out the template on paper and transferring to freezer paper, I just traced it off my computer screen. Doing it this way, I was able to cut out my freezer paper to size (to make sure it fit on the shirt and pants), and then zoom in or out to make my bones fit the paper. Worked like a charm!

100_1514

I'll update tomorrow with pictures of them in costume! 
Because I know my boys, will some how get them dirty just taking pictures! Ha!


Thursday, July 26, 2012

No More Rust Ring!

Gosh! Has it really been that long since I made my ball jar soap dispenser?  Wow!

Anyways, I was sick of replacing or attempting to clean this:


I know. Duh. Water soaked hands getting soap, dripping on metal jar lid that was cut open.
And after thinking about it ( and working on something else) I thought why not replace the metal with plastic. So I did! I used some of that plastic canvas (that I don't know the true craft for!)


Yes it doesn't have the same old fashion flare, but now I dont have a rusty yucky ring looking at me!


Yea! One less thing to have to clean!


Thursday, January 19, 2012

Special Numbers Art

Before Christmas I saw this on Pinterest, and thought I could so make that!

Instead of creating it in Photoshop, printing and framing it I decided to paint it instead.

This was super simple too!


First I painted my canvas background, I "cheated" and spray painted it brown. 
Next, in a word document I picked out my font and typed in my dates. 

Our dates are our first date, day my husband proposed, out wedding date, and our boys birthdays.


Next I took a pencil and scribbled all over the back, and then placed it on my canvas.


I traced all my dates at once so that the spacing was correct.


Lastly, I started painting them in with white. 


I kind of wish that I made this super duper long, so that I could add dates down the road!
Wouldn't that be fun? Say Carter's first day of school? Or losing a tooth? When they get older and get married?