Showing posts with label Gift. Show all posts

Friday, July 1, 2016

{Recap} December 2015

Ah! December! Tis the season, to not feel like Christmas?
This year, the weather has been so un-winter-like that it never felt like Christmas to me.
Yes, the decorations were hung and Christmas activities where happening, but no snow? Boo.


Friends down south? How do you do it? 
Just like it doesn't feel like Christmas without snow here, I bet you would feel the same if there was snow on Christmas! Right?


 And yes, this is how I felt of most of December and January! 
Pregnant with baby number 4... Is hard!


To help being "busy pregnant" I made baby boy this awesome center out knit blanket. 
It's so squishy I want to make a giant one for me! 


Just a little something I put together for Carter's teacher for Christmas.
Fun glittery pencils, an insulated cup and then filled with gel pens!
Simple yet adorable, and I know she would use it all!


My boys LOVE Lego Star Wars, and my husband remembers seeing the movies when he was a kid and started watching them with them. So when we needed cookies for a school Holiday party, and I saw how easy these were.  Chewbacca cookies it was! 

These are chocolate sugar cookies, not gingerbread men. They were a hit at the party too! 
A simple gingerbread man cookie cutter, and fork make the hair. Chocolate frosting and sprinkles! 
And yes, I was that mother using tweezers to pick out five sprinkles of one color! 


Lastly, the table is almost complete! 

My husband really took his time with the table because the wood was no kiln dried. 
So he wanted to let the wood acclimate a day or two in between steps to try to prevent warping and pulling. Hence, the table upside down in my dining room!


Wednesday, June 8, 2016

{Recap} June 2015

Ah, June 2015 the month we found out we would be having another baby! 
The month where blogging slowed down...  But there were definitely things to blog about! 
So here I am trying to recap what happened June 2015...

As usual the garden was booming....


and most important my "baby", my oldest son graduated from Kindergarten! 
And yes, I did cry!


To celebrate, and thank his teachers I had this grand idea to make them cute tote bags. 
In my head, I wanted to use my sister's silhouette to use Heat Transfer Vinyl. And well, that was an epic fail. We could not for the life of us get it to cut, we followed several tutorials online and in the end wasted an entire roll of vinyl. I was convinced we got a defective roll, since she has cut vinyl before so I contacted Silhouette.  I was just as disappointed with their customer service as their product, so my dreaming to own a Silhouette days are over.  

Anyways, end of negativity.

So I went the old tried and true route, paint! 

Yes, All I did was pencil out my design and free hand painted with puffy paint.
Now before you go thinking puffy paint? 
Doesn't that scream 80's sweatshirts?  
Hear me out.


If you go super slow with puffy paint and squeeze hard you get that 80's look.
If you get your "squeeze" or tension right white bottle it does not come out like that. 
Yes, it's three dimensional but if you paint thick with a thin tip paint brush you would get similar results too.

So I found cute quotes for my son's Kindergarten Teacher and her Aide. 
I think they came out cute! I then rolled them up and tied them like a diploma so carter could hand the tote diploma to them!


There you have it, a couple things I did for June! 


Thursday, July 24, 2014

Crochets: A Gift for Baby C!

A friend of mine is due with her first baby at the end of August.
Let me tell you, her nursery is gorgeous! 
Not too babyish, but trendy, modern and adorable!
Grey, White and Yellow gorgeous.

So as soon as she let me know that Chevron was in the works for the nursery, I knew a chevron baby blanket would be the perfect handmade gift! 


It took me several tries, with several patterns and several yarns to get it just right for Baby C! 
In the end I ended up using a pattern that only had 5 stitches up, then create the zig or zag. 
What I liked the most about this pattern was the first and last stitch had two stitches in it, so it was much harder to mess up the edges ( definitely one of my downfall with crochet at times!)

I can't remember where I found the pattern since I tried at least five! 
But this is what it was

Chain width of blanket in multiples of 12+2. Turn.
SC two in first stitch. *SC in next five stitches. SC 3x in next stitch. SC in next five sts. Skip 2 stitches. Repeat from * to end, SC two in last stitch. Turn
Repeat until desired length. 

Now that I got the pattern down I will definitely be doing again! 
Once I finished the blanket, I made a matching yellow hat (using this pattern) for Baby C, 
and can't wait to find out if Baby C is a he or a she!


Wednesday, March 26, 2014

Crochets: A Gift for Baby C!

Things have been so super busy since I started teaching a couple weeks back! 
I'm hoping to wrap up some projects this week so I can photograph some of the amazing pieces my students have created!

But in the meantime, I wanted to share this baby blanket I made for Baby Boy C! 
I have to say this might be my favorite that I have done in a while!
I am loving the navy blue and white combo! It's just so classic to me!  

This was a great project to work on since it was rows of HDC (read: no thinking/pattern involved), until it was the size I wanted. Then I went around the edge to create a border. The key to the border was to do one round of SC in blue first (I tried jumping right into the white, and it didn't look great). Then two rounds SC in white. Then two rounds SC in blue. 

Then using HDC I crocheted a matching hat! I love baby hats, they are so quick to whip up!

Baby Boy C had an adorable Dr. Suess shower, and I loved that instead of a card you include a book, and to sign in the book so they could keep it and know it was from you! Such a great idea! 


Thursday, January 24, 2013

Crochets: Dishcloths

To go with my Brown Sugar Bath Scrub, I made up some of this adorable washcloths.

What I loved most about them was that they had a loop to hang them up!

I found the original pattern here, and adjusted it to fit my needs.


My Adjustments:

I made my loop ten chains, and then did 20 single crochet (sc).
For the rest, I used half double crochet (hdc) instead of single crochet(sc). 
I didn't count my rows, just worked them until they were 6" x 6".
I used cotton yarn, and a size G hook.
I did not change colors, just one color.

Wednesday, January 23, 2013

Gifts: Brown Sugar Bath Scrub

Each year I make gifts, and this one is definitely going to be a keeper! 

I found the recipe online, but it's simple enough that you can change it up!


2 cups Brown Sugar
1 Cup White Sugar
Vanilla Extract
1 Cup Oil

Mix. 
Yup. Thats it.
Put in a jar, add a bow and tag!
This made three small jars.

I used white yarn that matched the washcloths I gave with the scrub. I'll share tommorow! 
And to make the tags, I used my circle punch, white cardstock!


Can you imagine mixing different extracts or essential oils?

The possibilities are endless!


Friday, November 30, 2012

Sews: Embroidered Onesies

The baby boom has begun! 
Everywhere I look there are pregnant women and babies! Me included! 

Remember I made these cuties? 
(Huh. I can't find them, have I ever blogged about these???)
Anyways, here are pictures of the onesies from a couple years ago that I did.

The uncle and aunt from the first two of onesies are now becoming the daddy and mommy!

For the nephew!
(Made Fall 2010)


For their little guy!


Gotta love when people come up with clever sayings!

Can't wait for pictures of Baby R wearing these!

Thursday, January 19, 2012

Special Numbers Art

Before Christmas I saw this on Pinterest, and thought I could so make that!

Instead of creating it in Photoshop, printing and framing it I decided to paint it instead.

This was super simple too!


First I painted my canvas background, I "cheated" and spray painted it brown. 
Next, in a word document I picked out my font and typed in my dates. 

Our dates are our first date, day my husband proposed, out wedding date, and our boys birthdays.


Next I took a pencil and scribbled all over the back, and then placed it on my canvas.


I traced all my dates at once so that the spacing was correct.


Lastly, I started painting them in with white. 


I kind of wish that I made this super duper long, so that I could add dates down the road!
Wouldn't that be fun? Say Carter's first day of school? Or losing a tooth? When they get older and get married?

Tuesday, January 3, 2012

Toffee Popcorn

After making my White Chocolate Popcorn,
I got thinking about my mother's neighbor's Toffee Popcorn. 

After a search I found this recipe and got to work.

I didn't change much from the recipe, except for the baking. 
(Oh, and peanuts! I left them out since we are unsure of Carter being allergic)
I struggled with stirring it in the oven, so I gave up, but it came out just as good as I expected. Plus I have a teeny tiny wall oven from ancient times so it's hard to find pans that fit too. 

I'm jealous of anyone with a normal sized oven!


As for the pans I used, I found that a metal cake pan that was lined with foil and sprayed with Pam worked best. My cookie sheet ( with sides) just greased didn't work so great, it actually started to burn the excess toffee.  Which tasted like roasted marshmellows ( I kept it for myself!) Lastly, my glass pyrex with Pam made for very sticky popcorn on the bottom layer, it didn't harden right. So, I am guessing that the tin foil helped harden all the popcorn ( At least I think so!)


Either way, it was delish and I will be making again!


Friday, June 17, 2011

Happy Dad's Day... Early!

Need a quick gift for Dad? 
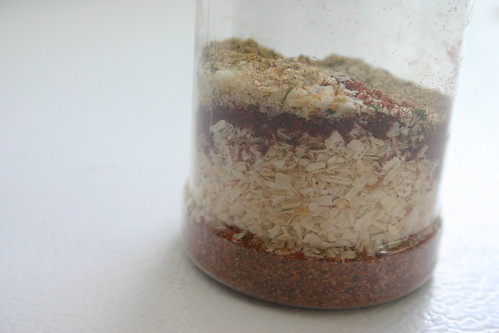
 Remember my seasoning recipes?

 Well, I took some of them and stacked the ingredients instead of shaking them up.  See? 
Perfect for the grilling dad who's getting a gift certificate to the butcher!
 Can you tell  my dad is a meat and potatoes kind of guy?

Stacked Seasoning Gift

I'm in the process of decorating and making labels now...

Have a great weekend!

Tuesday, January 11, 2011

If I keep doing Christmas posts...

I may get some of this next year!

COAL!

Using my salt dough recipe (same as my candy corn),
I made some perfect gag gift worthy coal!


And it doesn't take much either!

Recipe:

1 cup salt
1 cup flour
1/2 cup water

Make your dough, divide into a bunch of balls.  Drop, mush, and form them into any shape that resembles coal.

"Bake" in oven overnight.  ( Preheat oven to 300, turn off and put coal in oven overnight)


Paint black!  Perfect!


Thursday, January 6, 2011

2011 Calendars

Need an adorable calendar for your desk at work?  Here's an adorable version I made for gifts this year!


Cute, No?

Want to make your own?

Supplies:

Cd Case ( Yup, that's the stand!)
Scrapbook Paper
Small Calendars ( 2" x 2")
Scissors, Glue


I was lucky enough to find my calendars attached to a note pad at my local dollar store. But I have seen some advertised around blog land.  They can be as big as 4"x4" if you want more calendar and less scrapbook paper.  

Let's get started!

Start by cutting your scrapbook paper to fit your cd case.  Mine were 5" tall and 4 3/4" wide.
This may vary depending on your cd case.

Then start gluing your calendar and embellishments to your main piece of scrapbook paper.


Repeat until your entire calendar is done!


Stack your calendar pieces in order and slide into cd case 
where the "lyrics" book normally goes!

Open your case until it will not go any further.
Put the part where your cd goes face down on table, 
and admire your newest desk accessory!


Tuesday, January 4, 2011

Personalized Ornaments

Last year, I purchased some punches to make some "washer" necklaces that were all the rage. Well, I never got the right washers to fit my punch until maybe November.  That's when I made my sister a cute necklace for her birthday.  ( And of coarse no pictures. sigh.) 

 But what I did get to do with my punches for Christmas, may be my favorite handmade gift I gave this year!

It all started after running into my local Joann's store, and I noticed some really cute metal ornaments. I purchased a couple, just to make for us, but in the end went back for more!

Using a hammer, my punches and the ornaments I came up with these beauties!


I have found that the trick for getting good punches is to work on a solid (and I mean solid) surface!
I have had the best luck using my concrete stairs outside!  

I wish I grabbed a couple more hearts for Valentines day!