
Wanna granny?
Well, that's what we are working on today.
How to make a granny square.
I edited a real granny square pattern by changing up some of the numbers to be less confusing!
Here is my edited version of a granny square:
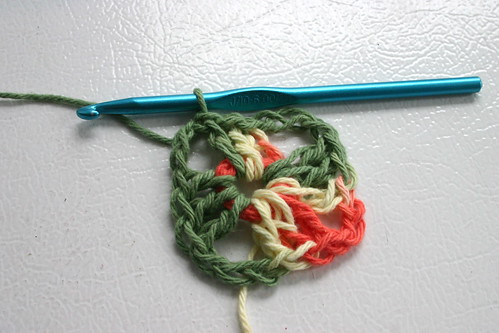
Round 1:
Ch 6, join with sl st.
Ch 2, then 2 dc. (first bundle of dc's)
Ch 3, 3dc (creates the first "hole" and second bundle of dc's)
Ch 3, 3dc ( creates the second "hole" and third bundle of dc's)
Ch 3, 3dc (creates the third "hole" and fourth bundle of dc's)
Ch 3, sl st to join. ( in top of first dc you get to)

Sl st in next 2dc to get to "hole"
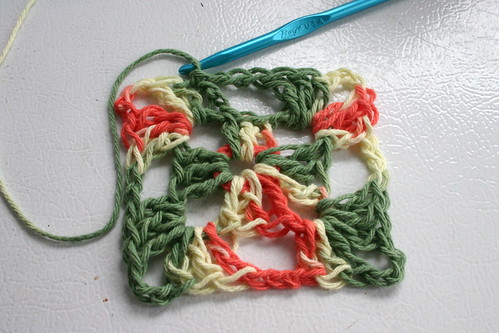
Round 2:
Ch 2, 2dc in first "hole"
Ch 3 and 3dc in first "hole" again.
Ch 3 (gets you to the second "hole")
3dc, Ch3, 3dc in second "hole"
Ch 3 (gets you to the third "hole")
3dc, Ch 3, 3dc in the third "hole"
Ch 3 (gets you to the fourth and final "hole")
3dc, Ch 3, 3dc in fourth "hole"
Ch 3 and sl st to join
**Now, you can either tie a knot and be done with the granny square and make a ton to create a blanket or you can keep going**
To keep going:
Sl st in next 2dc to get to "hole"
Ch2, 2dc in first hole. Continue to Ch 3 and 3dc in first hole.
Ch 3 to get to next hole, 3dc in next hole.
Ch 3 to get to corner hole, 3dc, Ch 3, 3dc.
If you want to change colors your can, or if you want to continue with just one. The bigger it is the bigger the square. Like this blanket.
If you want to change colors your can, or if you want to continue with just one. The bigger it is the bigger the square. Like this blanket.
Continue around. Here's a visual way to think of this pattern: If you are at a corner you need to 3dc, Ch 3, 3dc. If you are in a square that is not a corner you just need to 3dc in the hole and Ch 3 to get to the next hole.

No comments:
Post a Comment
I love hearing from you! If asking a question, make sure to leave a way to get in contact with you!
Thanks for visiting!