Showing posts with label Sews. Show all posts

Wednesday, November 5, 2014

Halloween 2014

If you haven't noticed in years past, I've tried to keep the kids costumes within a theme. Well. This year I didn't! I wanted to, but decided it against it.

So without further ado, we have the Flash, Super Why, and Anna from Frozen!

(the best  picture of the three of them on Halloween!)


I have to thank my sister, for the freezer paper stencils for all the kids shirts. (She has a Silhouette)
It made making their costumes that much easier!


For the Flash, I started with a red long sleeve shirt, red sweatpants and yellow and red felt.
First, I freezer paper stenciled his shirt. 
Using felt, I made him a mask, belt and boots. 
I love fleece and felt for costumes, no hemming required!


For Super Why, I started with the same thing, shirt and sweatpants, but in blue and Green fleece.
 I used a my creative license to change the shirt up a bit.
Super Why has a book, on his shirt. But my Wyatt is always pointing out W's so I did that instead.
Again, freezer paper stencil for the shirt. 
Fleece for his cape, mask and belt. 


Princess Anna was easier than I expected!
I bought a white turtleneck (wanted light blue but didn't find), black tshirt, blue fabric, and pink fleece.
Freezer paper stencil on a black shirt, over a white turtleneck to look like a shirt and vest.
Then I whipped up a blue skirt, just a rectangle with an elastic waist!
For her cape, I used fleece. I cut out a circle and slit it to create the front, neck hole.
Then using another layer of fleece, I just mimicked the larger piece!
 For the closure, it's just two hearts with tails sewn in felt!

I love making my kids "semi homemade" costumes! A couple store bought pieces(shirts, pants) with some extra love make perfect costumes. Plus my kids are already asking to wear again, so after I get all the melted chocolate out of their shirts, they can wear their costumes again! 



Friday, August 15, 2014

Sews: Pretty Porch Pillows

A couple weeks ago, I shared on facebook that I was getting my sewing groove back.
These were a quick sew for the most part, and we've been enjoying the porch so much that I forgot to share how they came out!

When we bought out house, my mother gave me my Nana's glider and chair set. It was white, but because our house is white with black shutters, I painted it black. The cushions were so bad, that I had to make new ones. Being a college student, only working part time I did my best, and they were awful. I did red seat cushions with a black, red and orange fun pillow. But the fabric was cheap, it ripped, and faded terrible. Plus there were some outdoor cats in the neighborhood at the time that enjoyed it more than we did.  So this year I finally threw those out and made new cushions and pillows. 
Best decision ever.


This is what I had to work with! Just a plain frame!

Over the winter my mom got rid of a sectional couch and we saved some of the cushions for this project, so that cut the cost way down! Have you ever bought foam cushions before?
Holy Expensive.

Now, because I didn't have to factor in the cost of the cushions, I could spend a little more on fabric.
So off to Joann Fabrics I went, and sure enough I hit the jackpot! I found upholstery fabric marked down, plus the red tag fabrics with 50% off!  So the green worked out to be $4 a yard, and the black patterned was $9!


I started with the cushions first, and at first they were intimidating, but after one it wasn't bad!
I placed my fabric right side up on the table, put my cushion on top and wrapped it up the front and over the top. Then I pinned the sides so it touched the cushion sides. Pulled the cushion out, sewed it, then put the cushion back it. Then I pinned the front corners up and down (it looked like I was created a box tote) pulled the cushion out and sewed again.  The backs were the hardest part because they are curved, so I pinned them for now in place and am debating, velcro or zippers.


We lived with just the green cushions for a couple weeks, because I was scared to cut into the black patterned fabric! But then we had company coming, so I just did it! I could four envelope style pillows sewed in an afternoon. It used a ton of fabric, but now if I want more pillows I add more colors from the pattern.


I'm so glad I redid this set! We sit out on the porch now for lunch almost daily! Weekend coffee has happened out there too! The kids love going out when my husband is due home from work to see who can spot his car first! 
Who knew, a simple sewing project has added some square footage so to speak to our house!


Wednesday, March 12, 2014

Birthday Hat for Baby S!

Right before I started my teaching position, I made a 1st Birthday Hat for Baby S!
Mom told me the colors, and I went to work!
I love how it came out!
I made a bunch of these when Carter was a baby, 
and included them in presents for the birthday babes. 
They are so easy to make, I don't know why I stopped!


It's really simple to make too, cut your quarter circle. Sew your seam. Done.
If you want anything on the hat you add that first, then the boa embellishment after it's sewn!


Tuesday, December 31, 2013

Goodbye 2013, Hello 2014!

Every year I take a minute to look back at the top ten popular posts of All Things Fee!

And this year is no different!


(I've Revamped how I plan now, so check that out here! I think it's pretty genius, I never have to sit to meal plan again!)


and.... the number one spot goes to


Friday, October 4, 2013

Halloween Costumes of Years Past!

Can you believe it is the spookiest month of the year? Already?
Me neither!

Here are our past costumes! 

I'm looking for Carter's first Halloween Costume pictures( it was pre blogging days!)
He was an adorable elephant!


Next came the Monkey...


Then the Pirate


and the Parrot!


This year we had everyone on the same page for costumes until maybe two nights ago! 
So it is back to the drawing board I guess!


Wednesday, September 25, 2013

Sews: From Too Long to Just Right!

When I signed Carter up for our Library's Summer Reading Program, 
they gave us this great library bag! It's the perfect size for kids books, 
but the handles were way too long.

 
I thought of a couple different ways to fix this.
Knot them, too bleh

Cut and Bow them. Too girly (for Carter).

 Sew them into a "padded" handle! Just right!

Want to do it to your bags?


Pick how long you want your new straps to be. Sew across.


Take the  loop you created (center of original handle, to your sewn spot) and open it, push center of original hand to your sewn spot. 


Pin and stitch in place!


Repeat on other handle!


Really simple, and I know I have a couple reusable grocery bags that could use this too!


Monday, September 2, 2013

#Waverize It! Challenge!

Happy September! 
How about Waverly Fabrics 90th Anniversary?

To Celebrate Joann's Fabric and Craft Stores are hosting a contest, the Waverize It! Challenge!
Fun? Right!


I was sent this fabric, and man is it gorgeous! The weight of the fabric, the colors, everything about this fabric is great! When I opened the fabric I could not believe the colors, they are so my style! For a couple days, I walked around going room to room to decide where I should use it. Living room? Dining room? Bathroom? Kitchen? Oh the possibilities were endless! 

After really thinking about it, I decided why not jazz up my dining room. 


I kid you not, these are our everyday dishes! I love my mismatched Fiesta ware!
And I love that the fabric matched it!
But I didn't want to do something traditional, not a table cloth,  not window treatments. 
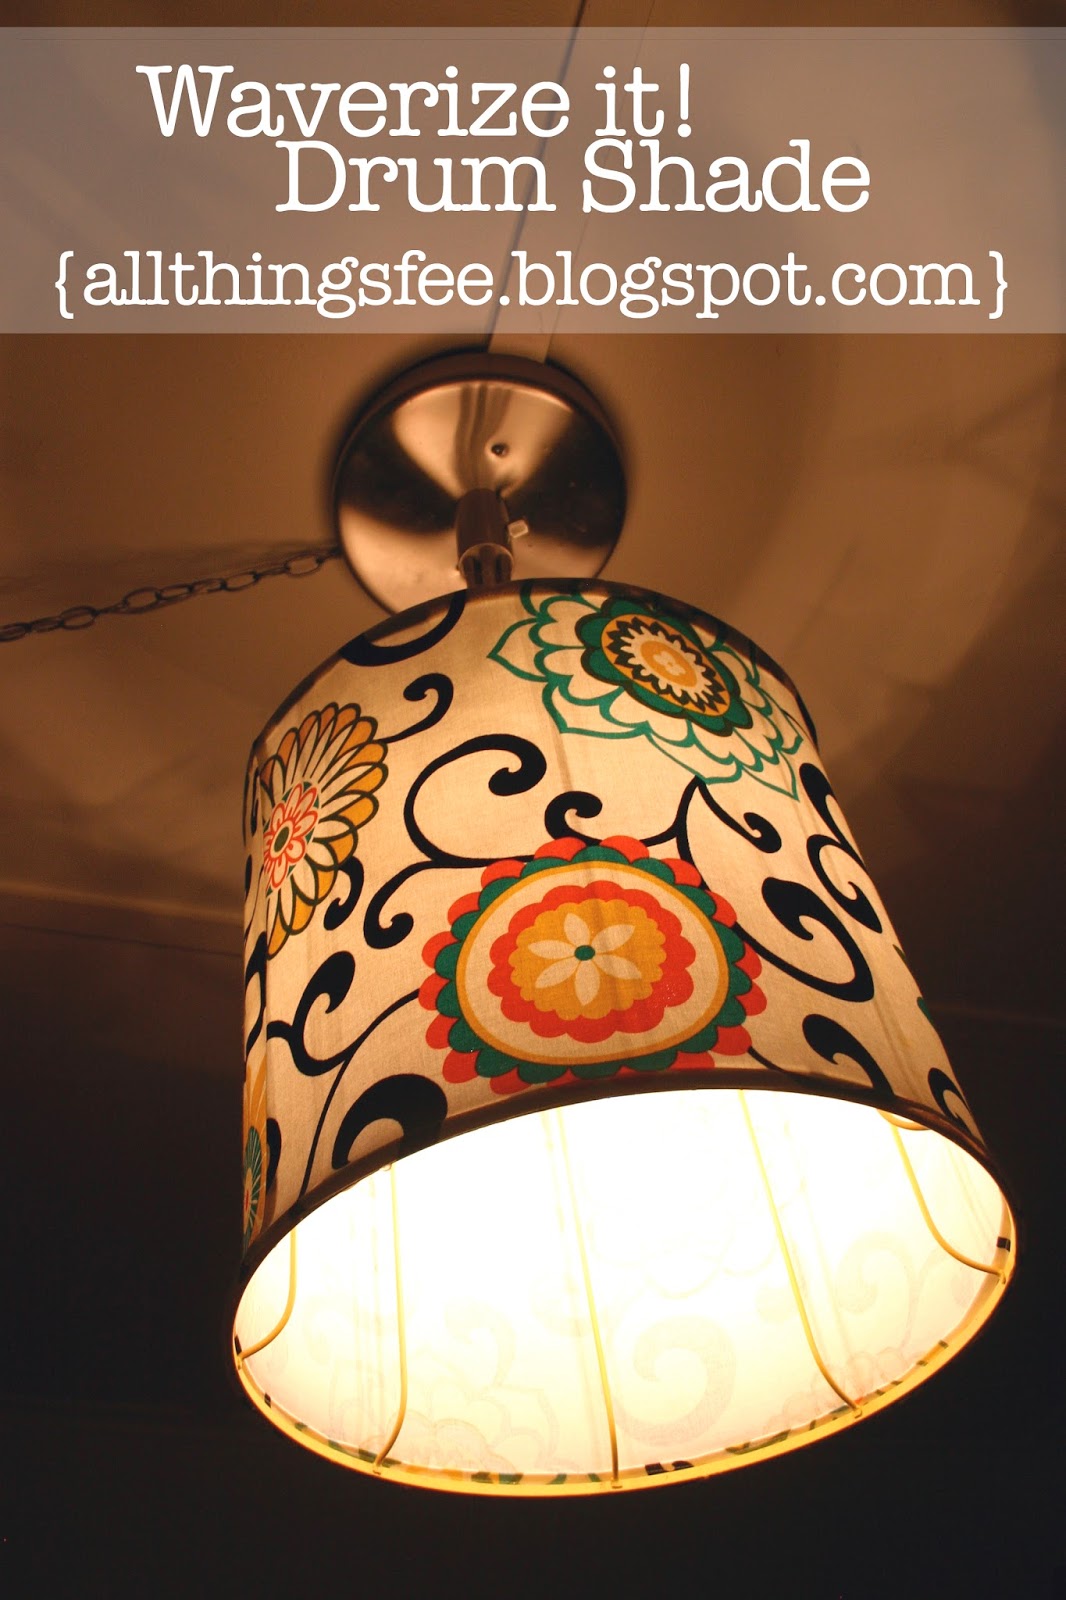
I wanted something unique.... how about a drum shade to update our light fixture?


What do you think?
Amazing right?
I think I hit unique and wow right on the head.

Everyone who has seen it has loved it! It's the first thing when you walk into the dining room that you see, heck, its the first thing you see when you walk into my house now!

To make the drum shade was pretty easy, so if you have never sewn. 
You could sew this.
It's all straight lines!
And only 3 seams!


To make your own drum shade you will need:
A drum shade/frame
Fabric
Sewing Notions ( Sewing Machine, Thread, Scissors, Etc)
Hot Glue Gun & Glue


First thing first, prepare your shade/frame. I mentioned to my mother I wanted to update my light and she said she had a frame! Perfect! So she brought it over and I began to remove the fabric since I didn't think adding the fabric to the existing frame would allow much light through.


Once the frame was bare, I took some measurements. Actually, to be honest, I just took the fabric and wrapped it around the shade! The fabric is 54" wide so I was able to use that to go around my shade and then measured the height and cut my fabric into a rectangle.

Here is where the sewing comes in! Super simple. 
You could probably do this with a hot glue gun if you don't know how to sew. 
But I sewed mine, so here's how:

Taking my rectangle to my sewing machine, I hemmed the top and bottom edges. 
This will be the top and bottom that you see all around my shade.

Once I got the edges finished I wrapped the fabric around the shade to double check where I needed to sew again to create my tube. The sewing gods were on my side for this project! I didn't have to cut any fabric, the 54" worked like a charm!

So back to the sewing machine! With right sides together, and my raw edges lined up, I sewed a straight line and created my tube! 

At this point I was getting so excited! I couldn't wait to finish!


But as I looked at my frame, I decided that the tan color was too boring, and I was going for wow.
Yellow spray paint? Yes please!

Once my frame was dry, I brought it inside, plugged my glue gun in and starting lining the edge of my fabric up to the frame. I used some clothes pins here and there to help hold things in place.
As I was gluing I made sure it was tight.


What do you think? Love it? 
I know I do!

Now, it's your turn to create something and enter the Waverize It! Challenge! 
All you need to do is create a project using Waverize Fabric, 
go to the Waverize It! Challenge and upload a picture! 

The Challenge runs through September 22nd, so get going and enter! 
Did I mention prizes? Fabric and a Joanns gift card? Every crafter's dream!

Thank you Joann Fabric and Craft Stores, and Waverly Fabric for this amazing opportunity!
 I love my new lamp, and it has definitely inspired more of my own projects!


Disclosure: This post is sponsored by Joann's Fabric Store. I was given the fabric to create something that would be used as inspiration for their Waverize It! Challenge. 

Thursday, May 30, 2013

Summer of JoAnn Inspired Bandana Blanket!


 Please use hashtag #summerofjoann when pinning!

After seeing this children's quilting class in the Spring Catalog offered at my local JoAnn's...
I couldn't stop thinking about it, and had to make it!

Because it was a class offered, I had not directions to go from. But based on the image it looks like they cut each bandana on the diagonal and then pieced together. (They also trimmed the edges off)
Then, backed like a traditional quilt.


I've always wanted a summer blanket that will:
-fold up pretty small ( to store in the car) 
- be light weight
-wash easy
-be water resistant on bottom
-be cute!


In order to make mine to fufill my "wants" I had to do it a bit differently!


I picked up 9 bandanas, so that I could sew them 3 x 3.
Using the bandanas make the blanket light weight, and that makes it fold pretty small!
The red and blue bandanas screamed summer to me!
Each bandana is roughly 22" square, making my blanket 66" square.


When I got home, I prewashed them. And boy was I happy I did. I assumed the red would bleed but in the end, the blue bled. And bad.

So Once they were dry, I started playing with them trying to decide how to cut them.
 Originally I wanted to cut them into triangles but then realized that I would have to square the bandanas up first, because they were just a bit off here and there. And because I'm terrible at getting a perfect square... you can guess what happened!

That's when I decided to not cut into them.
And by not cutting into them I could skip backing it if I could figure out how to get flat seams.
That's when the idea of using a zig zag like they do for applique-ing.


Using my largest zig zag stitch, then half the length, I got to work! It took some time to get the pieces lined up to start, but then it was a breeze!  I went over each seam twice. I'm thinking about doing it maybe 2 more times so that I know they are really strong. And to make them look like applique more.
(Any tips on how to get the stitch closer together? When I tried to get it like an applique, it jammed up!)


Now, even though I originally wanted a summer "quilt" I decided, why back it with fabric to just get wet, which will then make it heavy when folding up to go home with.
 And that's where a vinyl tablecloth, and snaps come in to play!


Put your vinyl tablecloth vinyl side down, with your your blanket on top and line up your snaps. 
Now, your blanket (and bottom!) won't get wet from the damp grass!

I love how a simple children's sewing project evolved into the perfect picnic blanket that will fit our family's needs! Now, the rain needs to go away so we can enjoy our new summer picnic blanket!

Did you know that you can sign up for exclusive discounts? 
Become a preferred customer today!

Friday, April 19, 2013

Reviews: HGTV's Home Dec Fabric!

Have you seen the latest fabric showing up at your local Jo-Ann's? 
The new HGTV Home Dec fabric?
It's so fun, and fresh! Perfect for Spring!

I was very fortunate to get my hands on some, and share with you what it was like!


The new vibrant, HGTV HOME line of home decor fabrics and trim are ONLY available at Jo-Ann's!

In store you will find 30 fresh prints and patterns, 
but don't forget to check online which has an expanded assortment of 74 exclusive designs!


What do you think of this pairing? Cute, no?

Here are the details of my prints!

The floral:


The checkered:


The hardest part about working with these fabrics, was what to make out of them!

Seeing as they are a sturdier, home decor fabric I decided to be a little selfish and make myself a purse!


The only things I changed on the tote was I expanded the center ( where you line it up on the fold) by an inch. I like my bags big! Which made the pleats change a little bit too! I still did them, just lined them up a little different.

The fabric was a dream to work with, it's always nice working with quality materials! 
Because this was the first time (in a while) I made a lined bag, I had some ripping out to do. And because the fabric is sturdy, and of good quality it didn't ruin the fabric when I ripped the seams out! There was some fraying of the edges after ripping out a few times, but that is to be expected. 
 I loved working with this fabric! So much so, I am already in the works with what to make with the rest of it! Check out their projects too.

Now, If you would like to get your hands on this amazing fabric. 
Here's your chance!


Here's a coupon, and better yet, if you use it from now until May 4, 2013 the fabrics are 50% off! 
Making you save 60%, what a great deal! So great, I'm even going to check it out!

**Please note: I was given this fabric for free to review. All the opinions are my own.**